I’ve recently started work that involved communication with embedded sensors, using Python. It’s a great language for the laptop/command centre side of a project, since actually communicating with sensors (where using C or C++ may feel more natural) is often a tiny portion of the total development work - you often also need to visualize results, send data over a network, implement a control algorithm, and so on, which is usually achieved more quickly in a high-level language
Now, the very short guide to doing comms with Python is: just read the pyserial documentation and use the struct module. However, in this tutorial I want to tell you about some other ways you can make working with sensors super easy, covering parts of those modules that you may not be familiar with. There’s a second post which makes the sensor code re-usable between projects, and much more pythonic
I’m going to base this tutorial around the OptoForce 3-axis force sensor to make the code more concrete, though it should be adaptable to most other sensors. I connect it to my laptop via USB. I’m using python==3.8.5 and serial==3.4, but nothing in this guide is specific to those versions
Side note: ipython is a far nicer REPL for the type of interactive work you’d do while figuring all this stuff out. You’ll have it automatically if you have jupyter installed
Let’s get started!
The pySerial module
If you don’t know, pySerial (imported as serial) is a library that makes it super easy to do serial communication in Python. The documentation covers installation and a short introduction which I won’t repeat here
Before you can connect to a device, you need to find which port it’s connected at. Manually setting the particular comport can get annoying, but pySerial can help automate that for you via serial.tools.list_ports.comports:
from serial.tools.list_ports import comports
devices = [dev for dev in comports() if dev.description == 'OptoForce DAQ']

if len(devices) == 0:
    raise RuntimeError(f"Couldn't find an OptoForce")
elif len(devices) == 1:
    dev = devices[0]
else:
    raise RuntimeError(f'Found more than one OptoForce: {devices}')
After running that block of code, dev will point to a ListPortInfo which holds information about the serial port the device is connected to. I found my device via the description, but the docs mention other attributes that you could use
Next, you need to open the connection. pySerial defines some useful enums for this, and I err on the side of explicit over implicit (since the defaults that totally make sense for the developers may differ from what you have) so I make a dictionary with all the parameters to keep things neat
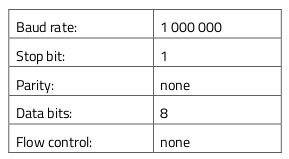
SENSOR_PARAMS = {
    'baudrate': 1000_000,
    'stopbits': serial.STOPBITS_ONE,
    'parity': serial.PARITY_NONE,
    'bytesize': serial.EIGHTBITS,
}
with serial.Serial(dev.device, **SENSOR_PARAMS) as opt_ser:
    do_stuff_with_the_sensor()
Why use a with block? If our code exits for any reason, we want to make sure that ser.close() is called to close the connection. Otherwise, you might run the code, hit a problem, and not close the connection. When you re-run the code, you wouldn’t be able to connect to the device without power cycling it. More on this in part 2!
If you tried that on a Linux computer and got a permission error, you might need to change the permission for that port. There are a few ways of doing this:
- From the same terminal instance where you intend on running your Python program, run the following command beforehand, replacing
/dev/ttyACM0with the port where your device is:sudo chmod 666 /dev/ttyACM0 - Do some reading on
udevrules – here is one tutorial - Change which group you operate as – this post describes it
Working with bytes
It’s common for sensors to have some sort of set up procedure to configure things like the sample rate. Similarly, when you read from the sensor, you’ll need to decode the bytes sent along the wire. Since the serial module expects and returns bytes, you’ll need to convert Python ints, floats and strs into the bytes which represent the types used in embedded systems: uint16, float32, char[], etc. For example, the OptoForce has the following configuration packet:
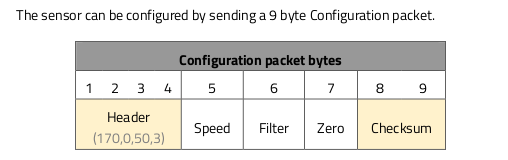
where Checksum (a uint16) is the sum of all previous bytes: 170 + 0 + 50 + 3 + Speed + Filter + Zero
Quick side note: Python’s built-in int type is more complex than an integer in many other languages (like C) - it occupies more bytes for higher integer values. For example, a C int32 fixed to 4 bytes, and if you increment it beyond the maximum size it can represent (2**31 - 1) you’ll get an overflow. In Python, incrementing an int beyond its maximum size will result in an int object which allocates more bytes, so that the value can be stored. This means that integer overflows simply don’t happen, and that you can store ridiculously large values:
>>> 2**999
5357543035931336604742125245300009052807024058527668037218751941851755255624680612465991894078479290637973364587765734125935726428461570217992288787349287401967283887412115492710537302531185570938977091076523237491790970633699383779582771973038531457285598238843271083830214915826312193418602834034688

>>> (2**999).bit_length()
1000
floats, however, are roughly the same as in C: 32 or 64 bits of best-effort. See Python’s documentation on numeric types for more info
With that in mind, there are two main ways of dealing with the conversion between Python types and bytes. The first approach is to use the readily-available bytes(), int.to_bytes() and int.from_bytes() functions, as shown below:
# data to encode: an two-byte int and a string
# (two bytes for the int since it's greater than
#  the maximum byte size (2**8 - 1))
>>> data_int = 300
>>> data_str = 'my message'

# encoded data -- the message is 10 bytes
# 'big' to specify endiannes
>>> data_bytes = (data_int.to_bytes(2, 'big', signed=False) + bytes(data_str, 'utf-8'))
b'\x01,my message'

# decoded data -- manually extact the '300' part, which is the first two bytes
>>> int.from_bytes(payload[:2], 'big', signed=False)
300

# and extract the message:
>>> str(data_bytes[2:], encoding='utf-8')
'my message'
Another useful trick: if the bytes() function is passed an iterable of integers in the range [0, 255], it will convert each int into a byte, returning a single bytes object (bytes([256]) results in ValueError: bytes must be in range(0, 256)). We can use that to build and send the OptoForce configuration packet mentioned earlier:
with serial.Serial(dev.device, **SENSOR_PARAMS) as opt_ser:
    # write sensor setup code - don't worry about this for now
    header = (170, 0, 50, 3)
    speed = 1  # 1 = 1000 Hz, 10 = 100 Hz, ...
    filt = 0   # don't pre-filter data
    zero = 255
    checksum = sum(header) + speed + filt + zero
    payload = (*header, speed, filt, zero, *checksum.to_bytes(2, 'big', signed=False))
    opt_ser.write(bytes(payload))
This approach works, but the Python to byte conversion becomes quickly becomes unwieldy when dealing with more complex cases. It also fails for float objects, which don’t have a .to_bytes() method and aren’t accepted by bytes()
Enter Python’s built-in struct module. It defines a mini language, similar to how string formatting and regex are mini languages, which helps you interpret bytes as packed binary data and back again. Again, I won’t do a deep dive on the struct module as they have examples in their documentation, but I will show you how I’ve used them to give you a relevant example
The basic idea is that you specify the data format as a string, which can be used to convert data to and from bytes (aka pack and unpack the data). A snippet of the format from the documentation:
| Character | C type | Python type | Number of bytes |
|---|---|---|---|
| c | char | bytes of length 1 | 1 |
| h | short | integer | 2 |
| H | unsigned short | integer | 2 |
| i | int | integer | 4 |
| I | unsigned int | integer | 4 |
| f | float | float | 4 |
| d | double | float | 8 |
| … | … | … | … |
In the mini language, ">i3cfd" would specify that a sequence of bytes represents an int (i), three chars (3c), a float (f) and a double (d), in that order. It starts with > to indicate that big-endian should be used, but could have started with < for little-endian, and the bytes sequence would take up 4 + 3*1 + 4 + 8 = 19 bytes
>>> import struct

# `struct` way of encoding the data from earlier:
# an int (h) and length-10 string (10s)
>>> struct.pack('>h10s', data_int, bytes(data_str, 'utf-8'))
b'\x01,my message'

# `struct` way of decoding: an int (h) and length-10 string (10s)
>>> struct.unpack('>h10s', data_bytes)
(300, b'my message')

# another example, involving three floats:
>>> struct.pack('<3f', 1.5, 2.5, 3.5)
b'\x00\x00\xc0?\x00\x00 @\x00\x00`@'
Back to the sensor - let’s unpack the data packet:
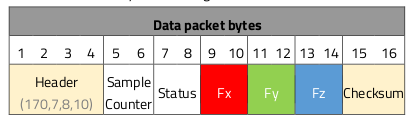
where sample counter, status and checksum are uint16s, while the forces Fx, Fy and Fz are int16s
In the code below, we read data until the expected header arrives (170, 7, 8, 10) and then read 12 more bytes after that (since it’s a 16 byte message). Then, we specify that we want to use big-endian (>) before reading two uint16s (HH), three int16s (hhh) and then a final uint16 (H). A totally direct translation! Note that the number of bytes adds up to twelve (len('HHhhhH')*2) - we’d get an error if it didn’t. struct.unpack returns a tuple, which we can directly assign to variables
    # ... code from above ...

    expected_header = bytes((170, 7, 8, 10))  # => b'\xaa\x07\x08\n'
    opt_ser.read_until(expected_header)

    data_bytes = opt_ser.read(12)

    # https://docs.python.org/3/library/struct.html#format-characters
    count, status, fx, fy, fz, checksum = (
        struct.unpack('>HHhhhH', data_bytes)
    )
The struct module is pretty small but very powerful - well worth a look!
Next steps
So, we can find the sensor, connect to it, set it up and receive data. The next step: make the code re-usable. In Python, we’d do this by refactoring this code into a class. This post is getting long enough, though, so I’ve split it off into a second post which covers context handlers, logging, configurability, usage, and packaging - all very useful stuff
For reference, the full code listing:
import serial, struct
from serial.tools.list_ports import comports

# find the optoforce
devices = [dev for dev in comports() if dev.description == 'OptoForce DAQ']
if len(devices) == 0:
    raise RuntimeError(f"Couldn't find an OptoForce")
elif len(devices) == 1:
    dev = devices[0]
else:
    raise RuntimeError(f'Found more than one OptoForce: {devices}')

SENSOR_PARAMS = {
    'baudrate': 1000_000,
    'stopbits': serial.STOPBITS_ONE,
    'parity': serial.PARITY_NONE,
    'bytesize': serial.EIGHTBITS,
}

with serial.Serial(dev.device, **SENSOR_PARAMS) as opt_ser:
    # write sensor setup code
    header = (170, 0, 50, 3)
    speed = 1  # 1 = 1000 Hz, 10 = 100 Hz, ...
    filt = 0   # don't pre-filter data
    zero = 255
    checksum = sum(header) + speed + filt + zero
    payload = (*header, speed, filt, zero, *checksum.to_bytes(2, 'big', signed=False))
    opt_ser.write(bytes(payload))

    while True:
        expected_header = bytes((170, 7, 8, 10))
        opt_ser.read_until(expected_header)

        count, status, fx, fy, fz, checksum = (
            struct.unpack('>HHhhhH', opt_ser.read(12))
        )

        do_stuff_with_sensor_data(fx, fy, fz)
A final code example
Finally, in case anyone wanted to see the correspondance between Arduino code sending data and Python code receiving it:
// Arduino code
const uint32_t laptop_baud = 250000;

void setup() {
  Serial.begin(laptop_baud);
}

void loop() {
  float height_m = 1.5;
  float velocity_ms = 3.6;

  // arbitrary header
  Serial.write((uint8_t)0xAA);
  Serial.write((uint8_t)0x55);

  // data
  Serial.write((uint8_t*)&height_m, sizeof(height_m));
  Serial.write((uint8_t*)&velocity_ms, sizeof(velocity_ms));

  delay(1000);
}
# Python code
import serial, struct

HEADER = bytes([0xAA, 0x55])
DATAFMT = '<ff'

with serial.Serial('/dev/ttyACM0', baudrate=250_000) as ser:
    ser.reset_input_buffer()
    while True:
        ser.read_until(HEADER)
        height_m, boom_pos_m = struct.unpack(
            DATAFMT, ser.read(struct.calcsize(DATAFMT)),
        )
        print(height_m, boom_pos_m)